Thursday, September 14, 2017

#3 & #4 All About Me


ALL ABOUT ME: 
Mr. Winkelman
I have been many things in my lifetime: Accountant, Executive, Salesman, Director, Contractor, Teacher, and a Pastor.

Currently I teach at North Star Charter School in Eagle, Idaho. We are a Public Charter School that has students from Kindergarten all the way to the Twelfth Grade. I wouldn’t want to work anyplace else! I teach 6th Grade Computer Science, 7th Grade Business Technology and 8th Grade Personal Finance. North Star is a great place to work, and I am on my second year here.

I met my wife at Seattle Pacific University, we got married when I was at West Valley College, Then we moved to Oregon where I went to Western Oregon University. We moved to Idaho and I went to work for a company called The Golden Rule Group--then I went back to Oregon to go to Oregon State University to get my teaching degree. Later I would also attend Northwest Nazarene University, Nazarene Bible College, and Boise State University where I would get my Masters of Education Degree.
I have three kids: Cameron (28), Leslie (25), and Britain (22). Cameron lives in New York, New York and works in the Times Square area downtown. Britain is in the restaurant business and manages a restaurant-movie business in Nampa. Leslie has a marketing degree from NNU and works in marketing as a free-lance artist. She designs and creates incredible western horse tack and boots.
In my classroom in Guesyni, Rwanda


I am also a Pastor of a community Nazarene church in Middleton, Idaho called Fill my Cup. I love being a Pastor and being in a position where I can help people in all areas of their lives.


Two summers ago (July 2014) I was able to travel to Rwanda, right on the equator of Africa. We were there for two weeks, and trained young men and women in Biblical studies. I taught a course on the Book of Acts. Some of my students travelled over one hundred miles, by bicycle or walking. Some had to sneak over the border from the Republic of the Congo, because of civil war in Burundi. It was an AMAZING EXPERIENCE! I cannot wait to go back again!

WHAT YOU MUST DO:

Now you create a POST that tells us everything all about you.


Friday, September 1, 2017

#2 How to Create Your Own BLOG

Blogger Getting Started Guide


Be sure to check out the entire BLOG remember that older posts are below newer posts. You may still have some lessons to complete.

Today you will use your CHROMEbook to create your very own BLOG. Here is a getting started GUIDE that will help you through the PROCESS. Once you have a BLOG set-up and designed. Please write your first POST to your BLOG:

ALL ABOUT ME! (A post that tells me about you)
Please check out my example; in this BLOG Goto the page
ALL ABOUT ME!
HAVE FUN!

Be sure to add some pictures to your BLOG and your ABOUT ME post too!

Once you completed your ABOUT ME post, create a new post, and post your MIND-MAP, remember to write a summary of your map as well. Your SUMMARY should be no less than 100 words and no more than 200 words. If you drew your map, and did not do it on the computer--that's OK! Use your phone to take a picture of your MAP and post that into your BLOG.

Now All About Creating a BLOG
Create a blog
To start a blog with Blogger, visit the Blogger homepage, CLICK on the APPS ICON near your name on your title bar.


enter your username and password, and click Sign in. Enter a display name and accept Blogger's Terms of Service. Then click the Create a Blog link and get started!
Pick an address (URL) and a blog title.


TYPE IN YOUR BLOG TITLE: Enter a Title for your BLOG the computer will tell you if you have a duplicate, if so, you need to enter another title.

TYPE IN YOUR URL: Usually this is part of the Title, something like:
yourtitlename.blogspot.com -- Always ADD the ".blogspot.com"


Then, choose your favorite blog template (this is how your blog will look when you publish it). Now get creative, add information to your personal profile, and customize how your blog looks, if you feel up to it. Start blogging now!

Dashboard
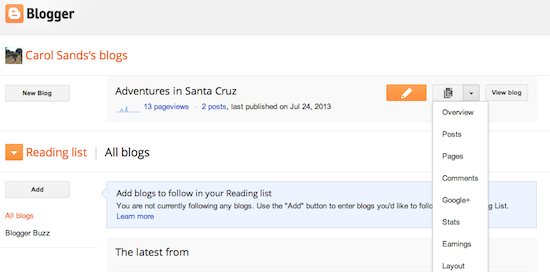

Your Dashboard, as always, is your starting point. This is where all your blogs are listed, and you can click on the icons next to them to perform various actions on each blog, such as:
  • Writing a new post: Just click on the orange Pencil icon on your Dashboard to access the Post Editor.
  • Viewing your posts: The gray Post List icon will take you to a list of your published and drafted posts for a specific blog.
  • Catching up on your favorite blogs: Below the list of your own blogs, you’ll see a list of the blogs you follow with an excerpt from their latest posts.
  • Everything else: Check out the drop-down menu next to the Post List icon for a quick link to:
    • Overview
    • Posts
    • Pages
    • Comments
    • Stats
    • Earnings
    • Layout
    • Template
    • Settings
Note that the Earnings tab will only show if AdSense supports your language.

Overview

Overview
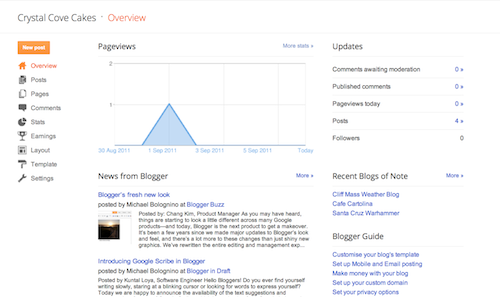
On the Overview tab, you can see your blog’s activity, news and tips from the Blogger team, and recent Blogs of Note.

Write your post

Once you've signed in to Blogger, you'll see your dashboard with your list of blogs. Here's what you need to do:
  1. Click the orange pencil icon to write a new post, and enter anything you want to share with the world.
  2. Next, you'll see the Post Editor page. Start by giving your post a title (optional), then enter the post itself:
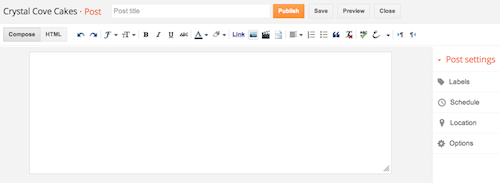
    New post
  3. When you're done, click the Preview button at the top to make sure it's ready to go, and then click the Publish button to publish your post.

Add an image

You can add an image from your computer or the Web to your blog. Click the image icon in the Post Editor toolbar. A window appears prompting you to browse for an image file on your computer, or enter the URL of an image on the Web.
Once you've selected your image, you can then choose a layout to determine how your image will appear in your post:
  • The 'Left', 'Center', and 'Right' options allow you to customize the way your blog text will flow around your image.
  • The 'Image size' options will determine how large the image will appear within your post.
Click UPLOAD IMAGES to add your image, and then click DONE when the notification window appears telling you that 'Your image has been added.' Blogger will then return you to the post editor, where you'll see your image ready to be published to your blog.
You can also publish images to your blog using your mobile device, Google's free photo software Picasa, or a third-party service like flickr.

Add a video

To add a video to your blog post, click the film strip icon in the Post Editor toolbar above where you compose your blog text. A window appears prompting you to 'Add a video to your blog post.'
Click Browse to select the video file from your computer that you'd like to upload. Note that Blogger accepts AVI, MPEG, QuickTime, Real and Windows Media files and that your video must be less than 100MB in size.
Before uploading your video, add a title in the 'Video Title' box and agree to the Terms and Conditions (you'll only have to do this the first time that you upload a video with Blogger). Then click UPLOAD VIDEO.
While your video uploads, you'll see a placeholder in the post editor showing where your video will appear. You'll also see a status message below the post editor letting you know that your upload is in progress. Depending on the size of your video, this usually takes about five minutes. When it is complete, your video will appear in the post editor.

Customize

Your template is a fun way to customize your blog. When creating a new blog, you're first asked to choose a default template, this is the basic design of your blog. You can choose from many templates for your blog; simply pick the one that best fits your needs.
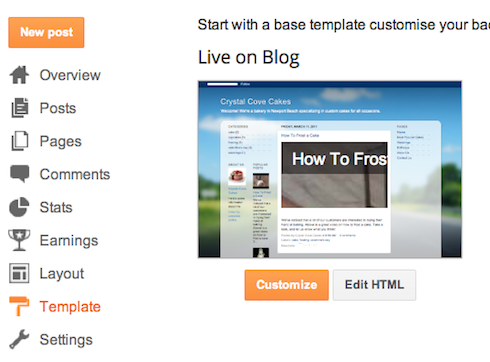
Template"
Once on the Template tab, you can either click on the orange Customize button to get started with our easy-to-use WYSIWYG (“What you see is what you get”) template designer, or choose one of our many default templates. If you’d like to edit the HTML of your blog, just click the gray Edit HTMLbutton.
In addition, you can customize your blog's design using our intuitive drag-and-drop interface. You can also add powerful gadgets such as slideshows, user polls, or even AdSense ads. If you want more precise control over your blog's layout, you can also use the Edit HTML feature. To edit your blog's layout, follow these steps:

  1. Click Layout from the drop-down menu on your dashboard below the blog you would like to customize.
  2. From there, click Edit to edit existing gadgets, or Add a Gadget to add new ones.
  3. To add a new gadget after you've clicked Add a Gadget, simply click the plus sign next to your desired gadget. You can choose from gadgets by category, or search for a specific gadget in the top right of the pop-up window.
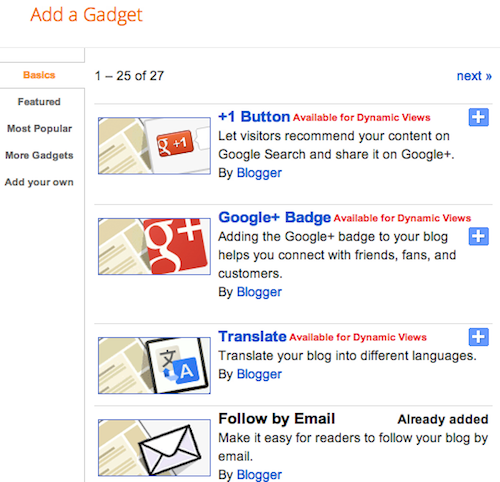
  4. add_gadget
  5. Once you've added the necessary information to your selected gadget, click the orange Save arrangement button. Your layout changes will appear instantly.

Privacy and permissions

By default, your blog is completely public, and can be read by anyone on the internet. However, if you want to keep it private, you can do that, too. You can change these settings on the Settings | Basic tab.
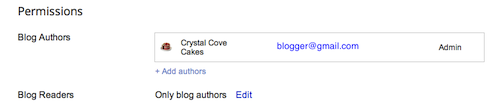
Permissions and Privacy
  1. Under the 'Blog Readers' section, you'll probably see 'Anybody' selected as the default. When you change this to 'Only these readers,' you'll get anAdd Readers button.
  2. Click the Add Readers button and then enter the email address of a person to whom you'd like to grant access to your blog. To add multiple people, separate their addresses with commas.
  3. For each address entered, the Google Account associated with that address will be given access to view your blog. If an address is not associated with an account, that person will receive an invitation email with a link allowing them do one of three things:
    • Sign in to an existing account.
    • Create a new account.
    • View your blog as a guest (no account required).

Monday, August 28, 2017

#1 Send Mr. Wink an Email


WHAT YOU NEED TO DO:

1. Log into the computer with your school login (lastname2024.northstarcharter.org)

2. Open the Chrome Browser (three colored circle with the other icons)

3. On the Browser Page top right-hand corner you will see, "mail", "images", the an icon--CLINK on "mail"

4. Go through the email setup--answer the questions asked

5. When at the "HOME" page CLINK on the red button that says "COMPOSE"

6. Enter my email address in the TO: line (mwinkelman@northstarcharter.org) double check the spelling
7. Enter in the "SUBJECT:" space the following: "6th Grade [TEAM NAME] (Either Warriors, Gladiators, or Barbarians)
8. Type a paragraph that is greater than 5 sentences about yourself--what you would like me to know about you
9 When finished CLICK the "SEND" button


Getting Started with Chrome Book


Getting Started with your Chromebook

BY  

UNDER CHROMEOSEDITORIAL 

Signing In, Updating Chromebook

When you first turn on your new Chromebook, it will require to first connect to the Internet. WiFi will be the preferred choice, but your Chromebook may have a Ethernet connectionOnce you are connected to the Internet, Chrome OS will start to look for the latest updates for your Chromebook. This is your first experience of why Chrome OS is excellent; automatic updates, bringing new features and improvements to your Chromebook every 6 weeks. If there is an update to download, the process will take around 10-15 minutes to complete.
Once updated, you will be next required to sign in with your Google account. This is the same account used for Gmail or you may have used it to enable Chrome sync on your computer. Once signed in, you will be required to select a profile picture; you can select your Google Account profile picture, or choose a Chrome OS profile picture or take a new picture of yourself using the built in web camera.
Thats it! You are all setup and ready to go. Chrome OS will take a few seconds to do the final setup. This is where Chrome OS really shines. If you currently use Google Chrome on your computer with Chrome Sync enabled, Chrome OS will now be downloading your Bookmarks, Extensions, History, Passwords and Web Apps from the cloud and applying them to your Chromebook.
Basically, you will be up and running within a few minutes, and you can start using your Chromebook without any other setup.

Learning the keys

Chrome OS itself uses similar keyboard commands as Google Chrome on your computer, however built into the OS itself, there is a handy keyboard commands reference, which lists all the available key commands.
Ctrl + Alt + ?
Chromebooks also has a different keyboard to what you may have seen on other laptops. For starters, there is no Caps Lock key. This has been replaced with a dedicated Search key which will launch the App Menu. The App Menu is a place where all your Web Apps are located, you can perform searches here; and soon it will be used to search Google Contacts. If you would rather have the Caps Lock key back, you can either use Alt + Search key which will act as the Caps Lock key; or to enable it permanently, you can change the Search key to the Caps Lock key under “Settings”. (chrome://chrome/settings/keyboard-overlay)
The Home, End, Page Up, Page Down and Delete keys are also missing, again there is a keyboard command to regain this function.
Ctrl + Alt + Up Arrow key – Home
Ctrl + Alt + Down Arrow key – End
Alt + Up Arrow key – Page Up
Alt + Down Arrow key – Page Down
Alt + Backspace  –  Delete the next letter (forward delete)
Ctrl + Backspace   – Delete the previous word
Finally, the Chromebook keyboard has replaced the function keys (F1, F2, F3, etc) with browser buttons.
Some of these browser buttons have secondary commands;
F4 + Shift – Full Screens the active window
Esc + Shift – Open Task Manager
Alt + F6 – Keyboard Brightness down
Alt + F7– Keyboard Brightness up
Ctrl + F4 – Mirror Monitor
Ctrl + F5 – Take Screenshot
Finally, the Power button has two modes. A short press will Lock the Chromebook, a large press will shut down the Chromebook.

Personalizing

Like many desktop operating systems, there are plenty of customization options. To change the desktop wallpaper, you can either right click on the desktop and select “Set Wallpaper” or access the option from Settings. You can select wallpapers which come part of Chrome OS, or select your own wallpaper.
Chrome OS has a “dock” for launch apps from and managing open windows. To add an app to the dock, open the “App Draw” and right click on the web app, select “Pin to Launcher”. Web Apps can also be managed to open in a certain way; either as a full screen app, a pin tab or its own dedicate windows. These options can also be selected by right clicking on the Web App.

Welcome Computer Scientists


Computer scientists play a central role in our technological infrastructure. They develop hardware, software and other applications for use by the military, businesses and average consumers. This has made computer science one of the fastest-growing career fields in the U.S. today, with some occupations, such as software engineer, expected to grow an estimated 22 percent from 2012 to 2022. While this means tremendous opportunity for students and young professionals interested in the field, it also means increased competition, both at the college level and in the job market.
Many experts in computer science education tout skill development before college as the key to success. Students as young as six and seven are learning the logic behind computer programs and, in some cases, how to create simple programs of their own. Yet formal computer science learning remains a rare commodity in K-12 curricula. In 2011, just five percent of high schools across the country offered an Advanced Placement test in the subject. This gap has forced students to seek computer science education elsewhere.
Here at North Star Charter School we are dedicated to offering our students every opportunity to explore both areas of advanced study and areas of potential career opportunities. This course is designed to offer this exploration into the many aspects of computer implementation in business, personal finance, Art, broadcasting, gaming, and animation.
I am looking forward to exploring the future with you 6th grade students of North Star Charter School!